|
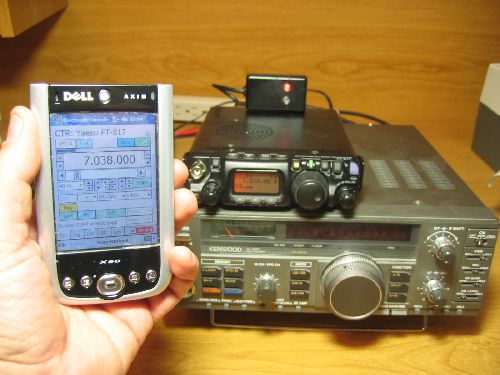
CTR-Remote controlling a FT-817 via Bluetooth
wireless technology
 CTR-Remote
is an enhanced version of
CTR817 (a Pocket PC radio control
program for the Yaesu FT-817). The program has been completely re-written using
Microsoft Visual Studio .NET and now supports a wider range of radios,
Bluetooth® wireless technology and/or
TCP/IP and Wi-Fi
radio control, ADIF
log import and export format, custom frequency lists,
DX Cluster
monitoring, callsign lookup, and enhanced scanning options. CTR-Remote
is an enhanced version of
CTR817 (a Pocket PC radio control
program for the Yaesu FT-817). The program has been completely re-written using
Microsoft Visual Studio .NET and now supports a wider range of radios,
Bluetooth® wireless technology and/or
TCP/IP and Wi-Fi
radio control, ADIF
log import and export format, custom frequency lists,
DX Cluster
monitoring, callsign lookup, and enhanced scanning options.
Maybe all you need is a direct-entry keypad or vocal frequency announcement.
CTR-Remote can provide these functions too, at a fraction of the cost of a
dedicated keypad or voice announcement module.
By its very nature, the Pocket PC is a small device with an equally small
operating system and limited resources. The design philosophy behind
CTR-Remote
(and CTR817 for that matter) has always been to control the radio, not
manage the radio.
You won't find memory management or radio-specific features in this program. There
are simply too many rigs on the market to try make this program compatible with
all of the various features in each rig.
Therefore, CTR-Remote contains a basic set of standard commands that work
with the Yaesu, Kenwood, Icom, and Elecraft K2 radios. New models are
continually being added to the list of supported
radios so check back often.
The basic command set includes the following:
- Set and read the primary VFO frequency
- Set and read the radio's mode
- Set the tone/DCS control coding (FM only, depends on manufacturer
support)
- Set the Tx repeater offset (FM only, depends on manufacturer
support)
- Read the S-Meter (depends on radio model)
- Read the squelch/unsquelch mode of the radio (depends on
manufacturer and model)
Features
- Optimized for Pocket PC 2003 devices with Wi-Fi and
Bluetooth connectivity (runs on Pocket PC 2002 and Mobile 2005 too).
Can use the TCP/IP connection provided by Microsoft ActiveSync if you don't
have a network.
- Controls Yaesu, Kenwood, Icom, and Elecraft amateur radio
transceivers
- Direct keypad input
- Support for hardware buttons: change bands, frequency, and PTT

- Supports the ADIF logging format, both import and export
- Expanded logging for basic contesting
- Four user defined ADIF log fields
- Easy to use frequency list with priority scan flag
- DX Cluster connections on
TCP/IP and Wi-Fi with auto-tracking and enhanced band filtering - pick
just the bands you want reports on
- Callsign lookup - lookup any call on QRZ.com
- Lookup calls from the File menu or in the Log
- Automatically lookup DX cluster spots and display the name/QTH
- NCDXF/IARU
beacon scanning
- Built-in optional band plan automatically selects the correct mode for the selected
frequency
- Band-spread control allows easy fine-tuning
- Bandscope function
- "Car Radio Button" feature
- K1EL WinKey support
- Vocal frequency, mode, and DX Cluster call sign announcements with auto-announce modes
- History list remembers the last 20 frequencies visited
- Supports serial, Bluetooth, TCP/IP, and
Wi-Fi connections to
the radio
- Supports the CTR-BlueLync Bluetooth
interface
- Multiple radio interfaces are available
- Share a single Bluetooth device
- Bluetooth enabled
Morse keyer
Having problems getting
CTR-Remote to run on your Pocket PC?
Click here for the
solution.
Voice Files
Language files for frequency, mode, and call sign announcement are available in the
CTR-Remote Yahoo User Group Files area.
Click here to visit that
group.
Editing Voice Files
You can record your own voice files and use them in place of the supplied
files. Just use the Recorder built into Window to record new .WAV files. Edit
out the silence before and after each character and save your files on your PPC
or PC in the CTR application's folder. You can also create your own startup
vocal (in place for the Morse "CTR"). Just record a new WELCOME.WAV file
to replace the file shipped with the software.
Click here to
download the latest user manual for CTR products.
For questions about CTR-Remote,
click here to contact us
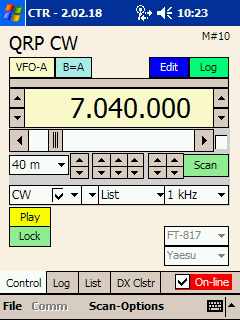
Screenshots
Control tab
The Control tab allows you to easily control your radio. Select the
radio manufacture and model then click On-line and the program starts polling the radio.
You can easily change the radio's band, frequency (just click on the frequency
display) or mode, vocally announce
them, start scanning, save the current settings to the List tab or log
the contact in the Log tab.
You can select various scan options and enable or disable the band plan mode
(auto-mode selection based on frequency). Clicking the box to the right of the
horizontal frequency control switches to fine-tuning mode (bandspread).
If supported, the S-meter level will be displayed on the bar below the VFO
buttons.
New in v2.20.02
(and CTR-Rcvr v1.10.06)
Hardware buttons can now be used to control your radio. Once connected, the
following buttons become active:
Button 1: Move to the next lower band
Button 2: Move to the next higher band
Button 3: Large step Frequency down (CTR-Remote) or volume down
(CTR-Rcvr)
Button 4:Large step Frequency up or PTT (CTR-Remote) or volume up
(CTR-Rcvr)
Cursor keys:
Up: Large step Frequency or List up
Down: Large step Frequency or List down
Left: Small step Frequency down
Right: Small step Frequency up
Select: Toggle selected scan mode
NOTE: This feature may not work on all Pocket
PCs.
New in v2.20.02
(and CTR-Rcvr v1.10.02)

A new "car radio button" option has been added to the control display. This
button bar gives you instant access to up to 12 favorite frequencies at the
touch of a button.
To toggle the button bar on/off, click the blue Btn button next to the
Lock button.
Each VFO holds frequencies and modes for six frequencies. Clicking a button
twice toggles between the VFO-A and VFO-B assignments for that button.
To save the current frequency to a button, click the top-left
corner of the button.
To edit the current button assignment, click the bottom-right
corner of the button.
K1EL WinKey Support

A new tab has been added to support the new CTR-BlueLync Keyer module. This tab also supports the
K1EL WinKey interface if your PPC has an
internal serial port. Just connect it to your PPC with a serial cable,
gender-changer, and null modem adapter.
CTR-BlueLync Keyer is based on the K1EL WinKey IC. It supports paddle inputs
and has a manual speed control pot. The interface will feature essentially the
same functions as the WinKey without the rats-nest of cabling and adapters.
In addition to basic functions such as a Morse optimized keyboard, speed, and
tune control, many pre-canned messages are available, most of which are user
defined.
A link to the log allows you to easily move between the log and the keyer
tabs as the QSO progresses.
The keyer module will be interchangeable with other CTR-BlueLync radio
control interfaces, so you can share one Bluetooth
module if you desire (one interface at a time).
Direct keypad input
Easily enter numerical data using the built-in keypad. Just click on the
frequency display to bring up the keypad. Great for getting
where you want to be fast!
Log tab

The
Log tab allows you to add, edit, and delete entries in your station log. Log
files are saved in the ADIF log format so you can easily import them into you
main log program on your PC. The program also imports
ADIF log files from other programs.
Specific log information is entered on the log edit screen. This screen has
three edit tabs, QSO, QTH, and Contest. Each tab contains
information about a specific part of the log entry.

Enter the basic details of the contact on the QSO tab.
The [*] button updates each field as follows:
Dt/Tm: Updates is field to the current date and time.
Call: Looks up the selected call on QRZ.com and automatically enters the
name/address information in the QTH tab.
Freq: If on-line, this button updates the frequency and band from the
radio.

The QTH tab provides name, QTH (address) and notes fields.

The Contest tab has fields for the Contest ID, Tx Serial #,
Rx Serial #, and four user selected ADIF fields.
The Tx Serial # will automatically increment by one for each new log
entry.
There are four user defined tags. Enter the ADIF tag name on the left. User tags
are "sticky", meaning they will be recorded in the log and remain until you open
a new log. Enter the specific data for each tag in the box on the right. This
data typically changes with each entry.
List tab 
The List tab allows you to store frequency and mode settings for the
radio. These settings can be easily recalled and sent to the radio with the
click of the scribe.
The List Edit window provides easy editing for each entry.
DX Cluster tab
The DX Cluster tab provides access to DX cluster spots via a
built-in Telnet interface. Simply select the URL name or TCP/IP address of the cluster and click the
Connect button. You can add or delete clusters by clicking and holding
on the Adrs list.
The program will automatically log
on to the cluster using your call. You can click the Track DX on option
and DX spots will automatically be downloaded to your radio. You can also select
local filters to filter spots for specific bands.
If you want to contribute to the DX cluster, enter your data in the Tx:
box (click and hold) and click Send.
Callsign
Lookup Feature
 An Auto Call Lookup feature has been added that allows you to lookup any
callsign on QRZ.com within the program. When selected, the name and QTH of the
station will be displayed in a window above the DX spot display. To close this
window, click the Close [x] button in the top-right corner, or
uncheck Auto Call Lookup on the DX-Options menu. An Auto Call Lookup feature has been added that allows you to lookup any
callsign on QRZ.com within the program. When selected, the name and QTH of the
station will be displayed in a window above the DX spot display. To close this
window, click the Close [x] button in the top-right corner, or
uncheck Auto Call Lookup on the DX-Options menu.
Click the Save to Log menu in the DX-Options menu to save the
spot to your log.

Callsign lookup is available in the Log Edit display. Simply
enter a call in the Call field of the log and click the yellow [*]
button next to the entry.
You can also lookup calls from the File -> Callsign Lookup menu.
Comm Options
 CTR-Remote
supports Com1 through Com8. Available ports will depend on your device. You can
also enable a TCP/IP connection on this menu and set options for your
Bluetooth device. CTR-Remote
supports Com1 through Com8. Available ports will depend on your device. You can
also enable a TCP/IP connection on this menu and set options for your
Bluetooth device.
38400, 19200, 9600, 4800, 2400, and 1200 baud rates are available for direct serial
connections and should be set to match the baud rate of your radio's serial
port.
Polling speed is adjustable and should be set above 350 milliseconds for most
radios, especially if the s-meter does not read reliably.
The Bluetooth Options menu allows you to
select the type of Bluetooth module you are using, change its name and serial
baud rate, and if supported, the transmit power and power source.
 Beginning with
v2.03.00, two new PTT options are provided, Hardware PTT and Software
PTT. Beginning with
v2.03.00, two new PTT options are provided, Hardware PTT and Software
PTT.
Hardware PTT allows you to use the RTS output on your serial
port to key your transmitter. If using a TCP/IP connection, you must also select
the Control RTS as PTT
option in CTR-Server.
Software PTT uses the PTT command in the selected radio's protocol to
key the transmitter. All models except the Yaesu FT-757 support this option.
Timeout allows you to set the PTT timeout period. If, after this time,
you have not unkeyed your radio, the program will automatically drop the PTT.
Finally, if you're using an Icom radio, the radio's CI-V address is automatically set
when you select the radio model#. You can change the default address in the
Icom Adrs menu.
Scanning Types
Several types of scan modes are available.
● Band scans the selected band at the
selected interval (1 kHz in
this example)
●
Range scans a frequency range you define
● Edit allows you to specify the frequency
range to scan ●
History scans the last 20 frequencies
● List scans the frequencies on the List tab
● Priority scans only frequencies on the
List tab with their
priority flag set
● DX Clstr connects to a DX Cluster server
then downloads DX spots
to the radio● Beacon automatically updates the call,
location and power level of the active
NCDXF/IARU beacon. This mode requires
your Pocket PC's clock to be accurately
calibrated. Click here to
download a
freeware application to calibrate your
clock. This utility has many other useful
TCP/IP functions.
Scanning Options
Various scanning options are available under the Scan-Options menu.
● Scan Speed adjusts the speed of the scan
● Scan Pause adjusts the pause time if certain
conditions are met ●
Unsquelch displays how scan treats an
unsquelched condition
● S-Mtr displays how scan treats an S-meter
condition.
In this example, the frequency changes every 2000 milliseconds and scan will pause for 5000 milliseconds when the S-meter is
greater than or equal to 6. Unsquelch and S-meter settings are mutually
exclusive.
Bandscope

A new bandscope has been added beginning in Version 2.10.00. To enable this
mode, simply select Scope in the Scan Type menu then click the
Scan button.
The scope has the following features:
●
Bandwidth is set by the Resolution control (1 kHz in this example)
●
Max Hold button (green button on top-right of the scope) holds the maximum
value for each sample. The signals turn red when this control is active.
●
Zoom button (blue button on bottom-right of graph) narrows the scope
bandwidth by a factor of 4.
●
Point and click navigation. Clicking on any signal on the scope automatically
moves the radio to that frequency. Scope scanning will pause for the amount of
time set in the Scan-Options -> Scan Pause menu then resume scanning.
The levels shown are the bandscope are read from the
s-meter. Not all radios support s-meter reads in their protocol. If they
don't, this feature will not work.
If possible you should set the radio's AGC to Fast when
using this mode.
The scan rate is slow because two commands are required
for each sample; 1) Set the frequency 2) Read the s-meter. You can speed up the
scanning somewhat by increasing the resolution and selecting the zoom option.
|